App Launchpad in a lab VCD that doesn’t have a public internet facing URL

So you want to get App Launchpad setup and running in your lab VCD but find out there is a requirement to have your VCD instance exposed publicly to the internet. For most of us with a home lab or even a lab in the office, this is not possible. Luckily there is a way to make this happen! (This will hopefully be removed as a requirement in the future but as of writing this with ALP 2 it is.)

The problem is step 3 in the process shown below. This is where the Marketplace requests VCD to create a catalog.

So what follows is a walk through of what you can do to circumvent this issue. (Thanks to William Zhou who helped work to put this together.)

Step 1. Get logged into the VMware Marketplace. The link is here. Then browse to On-Prem applications.

Step 2. Multi select several applications that are applicable for both On-Prem and Cloud Director. Click Subscribe to open the subscribing page. Click On-Prem and proceed to create the subscription.

Step 3. On the last screen of subscription creation, click Check Subscription.

Step 4. View the details of one application you just subscribed.

Step 5. Copy the subscription link to clipboard. You’ll need it later so don’t loose it!

Step 6. Go to vCD where you have already installed App Launchpad. Logon to Provider portal. Open Organizations. Then jump to organization App Launchpad

Step 7. In tab Libraries → Catalogs, create a new catalog. 

Step 8. Name the catalog and toggle on Subscribe to external catalog, paste the subscription link from your clipboard. 

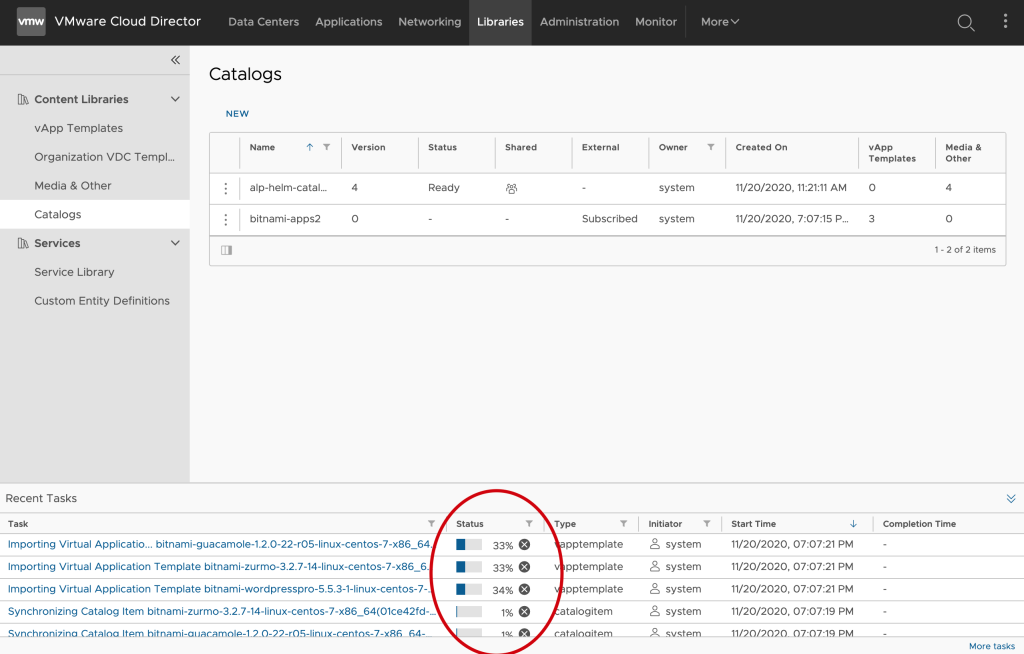
Step 9. Once the subscription succeeds, the application import starts. You can check progress from vCD task panel

Step 10. Wait for the application import to complete. 

Step 11. Open App Launchpad portal, navigate to Applications tab, you can see those Bitnami applications. Then you can publish this catalog to your tenants and create workloads there.

I hope this helps you to get App Launchpad running in your lab! Happy launching.

Guided tours in VCD 10.2

One of the cool new features of the latest release of VCD is guided tours. This allows you to make tours available to your tenants to help them navigate more complex tasks. On top of that, you can actually create the tours directly in VCD by recording the steps and then go back and edit things to make sure it is perfect. This feature is going to make it much easier for you to onboard tenants and make things a lot more self service from a learning perspective. I will preface this with a qualifier that this is the very first drop of Guided Tours so it is fairly limited in functionality but does lay the groundwork for what will become an indispensable part of VCD. With that said, let’s dive in!

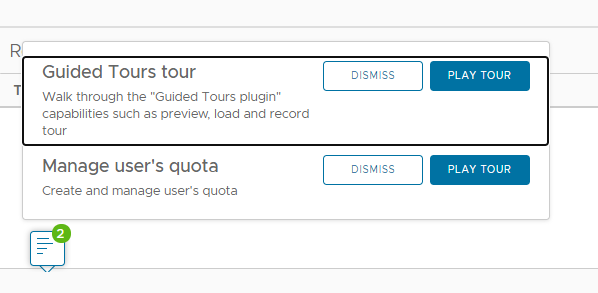
First off, when you log into VCD, you will see a little icon in the bottom left of the screen. This indicates you have unwatched tours available. Tapping the icon brings up the tours you have not watched. From here you can dismiss or play the tours.

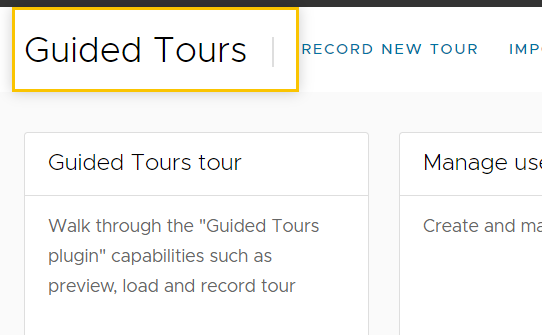
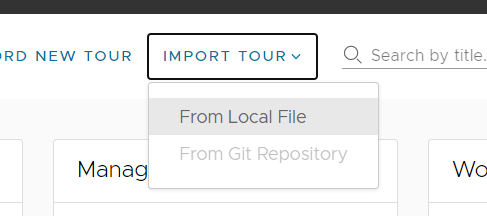
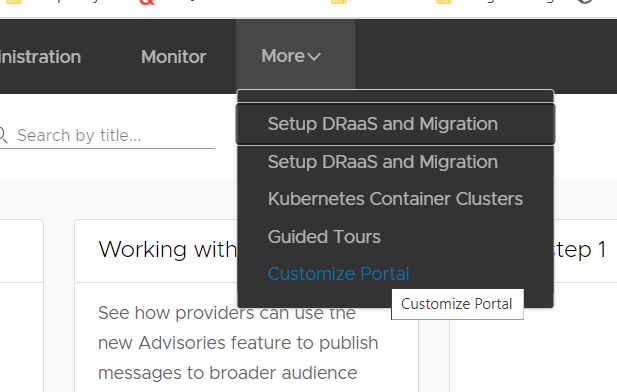
There is also a new menu item in More specifically for the Guided Tours section where you get to see all the tours available, edit them, import new tours or record new tours.

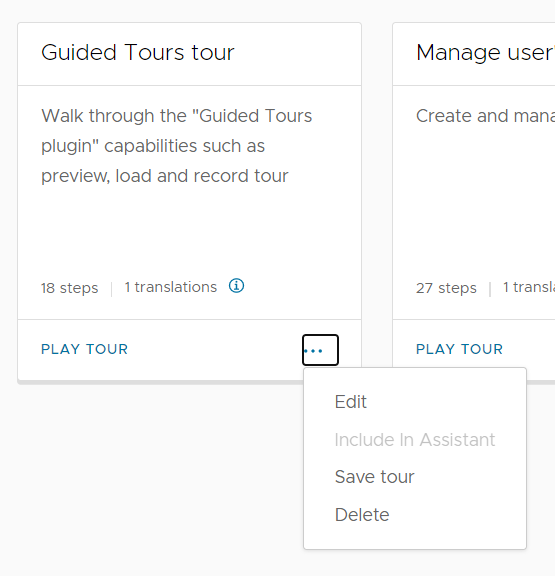
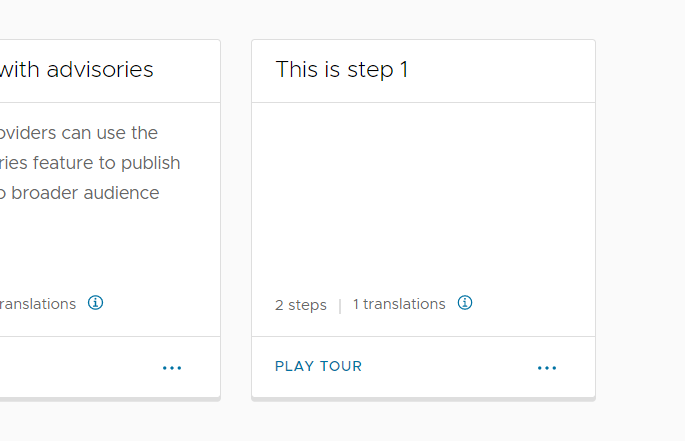
These are the three tours that come by default with the 10.2 release and the first is, fittingly, a tour of Guided Tours. From here, you can play one of the guided tours as well as edit, save or delete them. If you have completed the tour already or dismissed it from the assistant, you can add it back from here too.

You will also note that Tours supports different translations for the actual tour content. More on that a little later on.

Currently you can only share Tours that you as a provider create by saving them (to a JSON file) and then importing them into the tenant space. (As I mentioned before, this is the first drop of the tool and things like sharing tours with tenants directly from the Tour manager will be supported.)

Hitting the Record New Tour link will bring up a dialog like this.

As you can see, you use the Ctrl button to highlight an element and the Ctrl+Alt+D to provide the text about that element. This is the text that makes it into the tour. Once you click Start Recording you will see a number of options pop up in the lower left corner as well as a Stop Recording button in the lower right.

You can now proceed to recording the steps of the tour you are building. When you hold down the Ctrl button, a yellow highlighter box will wrap around the elements as you move your mouse over them like this.

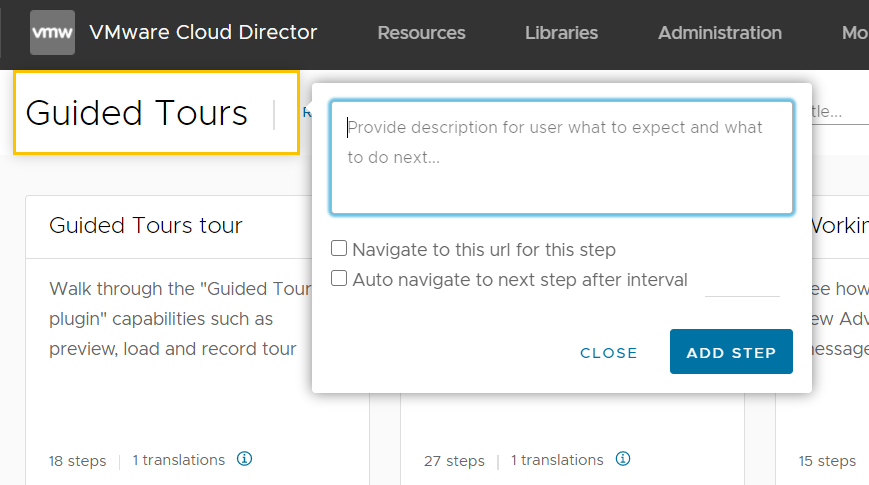
And once you press Ctrl-Alt-D, you get the ability to enter the details of that step.

You can optionally select to navigate to this step as well as progressing automatically after a set interval to the next step. As you progress through adding steps, you will see the step counter increase in the bottom left corner.

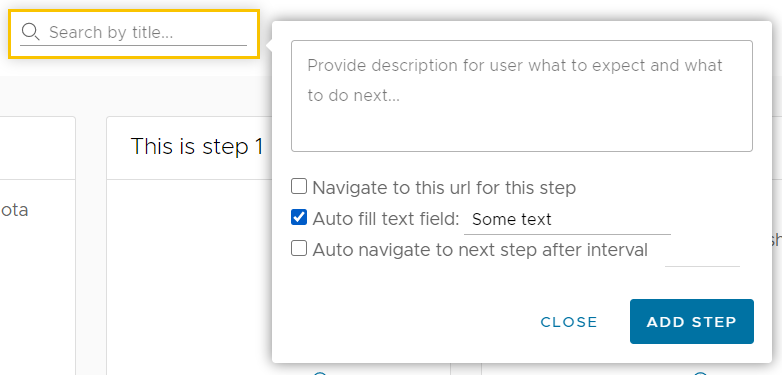
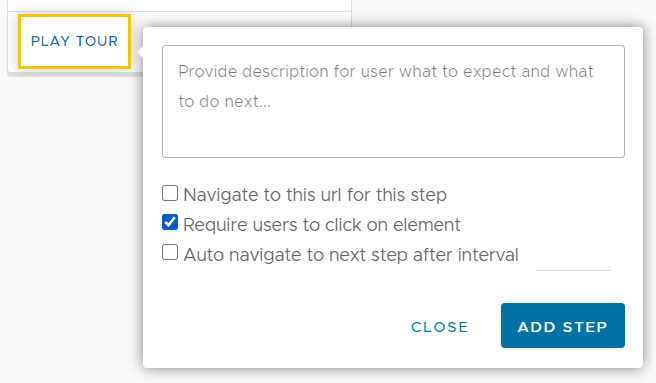
If the element you select can have an action performed on it, you will also get the option to configure this action. Below you can see the ability to enter text as well as click buttons/links.

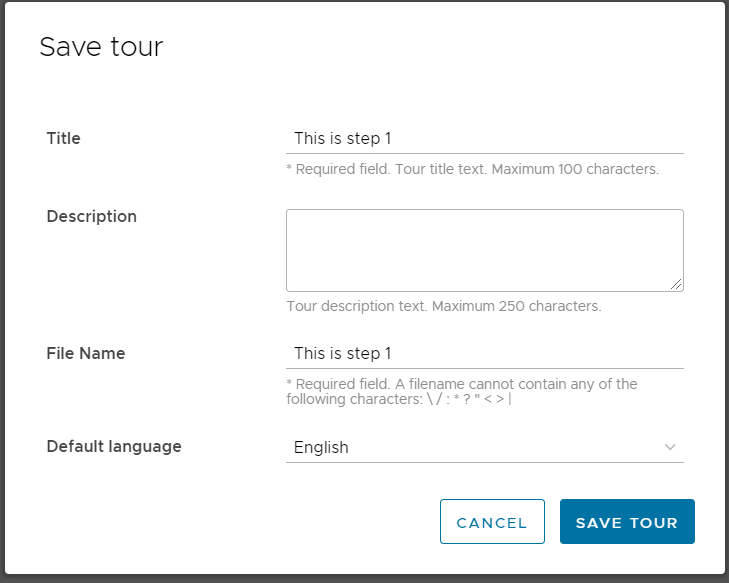
Once you have completed all the steps you can Preview the Tour in the bottom left. This will take you through the Tour you have just created. Once you are happy with it all, click Save Tour. This provides a popup to add some additional tour details like a Title, Description, File Name and the default language to present the Tour in. This step will save the Tour to your local machine.

The last step is to import the tour you just created.

Select the file you just saved and click open. The Tour will now be available in the Tour selection.

The last thing I want to go through in this initial blog on Guided Tours is how you make this available for tenants. This is done like many other plugins by going to the More > Customize Portal menu option.

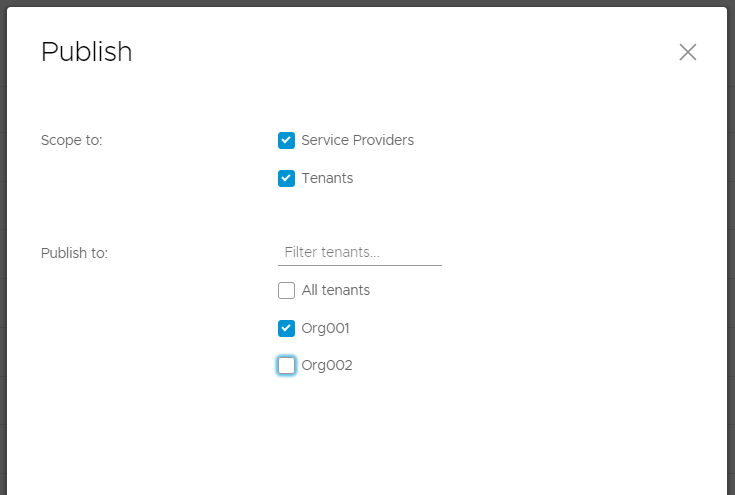
You can see at the bottom on my list of plugins is the Guided Tour plugin. Select it and click Publish. From the popup you will be able to select who gets to see Guided Tours.

Once you have enabled the Guided Tour functionality for a tenant, you can go and import all the tours you have prepared for them in the same way you did above. With the current release there is no way to share tours from the UI. This will be available in an upcoming release of Guided Tours.

Send us your feedback on this capability and let us know what you think.

Photon OS 3.0 – Resize the OS system disk

Let’s go through how to resize the Photon OS system disk. This is a fairly simple task but all the posts I found about doing this seemed to miss something along the way so here goes. This can be done while the VM is powered on.

First up, resize the disk in vCenter. Got to the VM and edit its settings.

Increase the size and click OK. It should only take a second or two to perform the update and in the recent tasks you should see the task completed.

Next up, SSH as root into the VM.
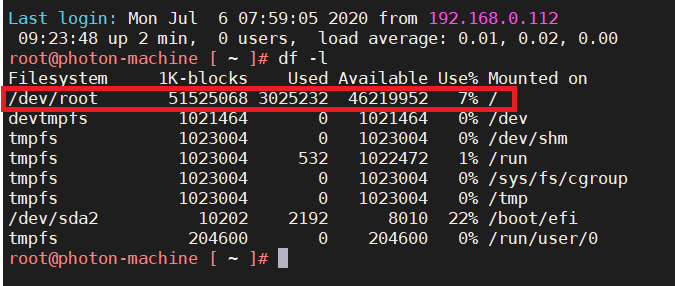
df -l
to see your current configuration. I am increasing from 50GB to 55GB for this walk through and below you can see my 50GB disk before we increase it’s size.

Rescan the SCSI bus for changes to the disks.
echo 1 > /sys/class/block/sda/device/rescan
and then
fdisk -l
to see the current partitions. You will notice the mismatch errors and the disk showing 55GB but the partition shows 50GB.

We are going to be increasing the size of /dev/sda3
If you don’t have parted installed do this now.
tdnf update
tdnf install parted
Next resize the partition
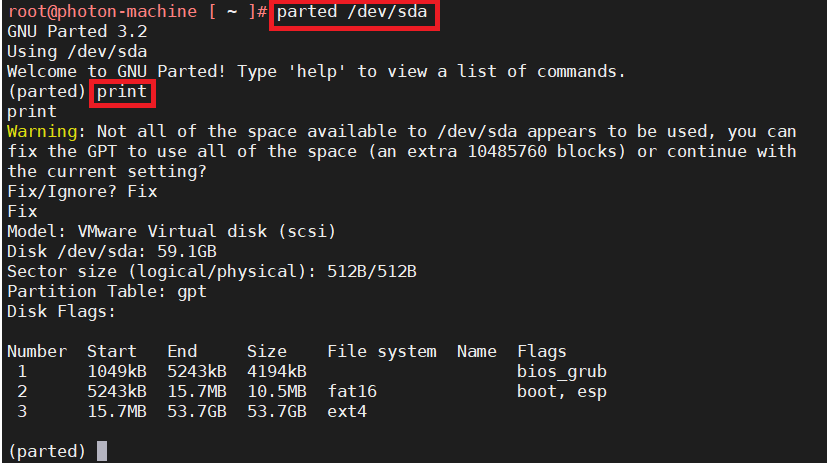
parted /dev/sda
print

When you are asked if you want to Fix/Ignore, type in Fix. You will then notice partition 3 is now increased to 53.7GB
Do the resize and let it consume all 100% of the available space.
resizepart 3 yes 100%

Exit parted
quit
and finally resize the file system.
resize2fs /dev/sda3

df -l
to see the updated size

SSL : Part 5.3 : vCloud Director 10 CA Signed Certificates

With the release of vCloud Director 10, further advances were made in the Appliance. There are now various types of configurations of the appliance that includes both application cells and DB cells (PostgreSQL). It has become more stable and I would recommend using it for any new deployments. A basic production installation consists of 3 DB cells and 3 app cells. The official VMware documentation does a fairly good job of explaining the deployment and can be found here.

In this post, I will go through the replacement of the self signed certificates on the cells. (In a previous post I explained how to deploy a Microsoft CA for use in a lab if you need one.) In this example, I will produce a single signed certificate that will server both the html 5 interface and the console proxy.

Step 1. First we are going to produce an unsigned certificate and place the, in a new certificate store. (It will be replaced with signed certificate later but we need the keys for the signing) Open a SSH session to your vCD instance and change to the /tmp directory. Execute the script below to create the certificate. It is placed in a certificate store called certificates.ks. You can ignore the warning about the JCEKS keystore using a propriety format. You should then have a file called certificates.ks in the /tmp directory.

/opt/vmware/vcloud-director/jre/bin/keytool \
-keystore certificates.ks \
-alias http \
-storepass ChangeMe \
-keypass ChangeMe \
-storetype JCEKS \
-genkeypair \
-keyalg RSA \
-keysize 2048 \
-validity 3650 \
-dname "CN=vcd-dc2-001.local, OU=VCPP Sales, O=VMware, L=Palo Alto, S=California, C=US" \
-ext "san=dns:vcd-dc2-001.local,dns:vcd-dc2-001,ip:192.168.28.81"

Step 2. Next we going to produce a certificate signing request (CSR) that we will send on to our Certificate Authority (CA). Once you execute the script below, you should end up with a new file called vcd-dc1-001-http.csr

/opt/vmware/vcloud-director/jre/bin/keytool -keystore certificates.ks \
-storetype JCEKS \
-storepass ChangeMe \
-certreq \
-alias http \
-file vcd-dc2-001-http.csr \
-ext "san=dns:vcd-dc2-001.local,dns:vcd-dc2-001,ip:192.168.28.81"

Step 3. From here we need to get the CSR signed by our CA. See Part 2 of this series to find out how. The output of that process will be a .cer file that contain the signed certificate. Make sure you also get a copy of the CA’s root certificate as you will need it in Step 4. See Part 1 of this series to get the CA Root certificate if you don’t already have it.

Step 4. We are now going to take the two .cer files collected in step 3 and load them into the certificate store file certificates.ks. You will need to use a tool like WinSCP to transfer the files to your vCD server. Once you have them there, execute the next two scripts to get the files into the store.

/opt/vmware/vcloud-director/jre/bin/keytool -keystore certificates.ks \
 -storetype JCEKS \
 -storepass ChangeMe \
 -import \
 -alias root \
 -file LabCA.cer
/opt/vmware/vcloud-director/jre/bin/keytool -keystore certificates.ks \
 -storetype JCEKS \
 -storepass ChangeMe \
 -import \
 -alias http \
 -file vcd-dc2-001-http.cer

Step 5. As I mentioned before, we are going to use a single certificate for both the html 5 server and the console proxy. The cell management tool is expecting two certificates with the alias http and consoleproxy. In order to make the tool work, duplicate the certificate with the http alias into and alias called consoleproxy using the scrpt below.

/opt/vmware/vcloud-director/jre/bin/keytool -keystore certificates.ks \
-storetype JCEKS \
-keyclone \
-alias http \
-dest consoleproxy \
-keypass ChangeMe \ 
-new ChangeMe \
-storepass ChangeMe

Step 6. Once this is done, list the contents of the certificate store to make sure all the bits are in there.

/opt/vmware/vcloud-director/jre/bin/keytool -storetype JCEKS -storepass ChangeMe -keystore certificates.ks -list

store.png

Step 7. Next, copy the certificate store to the transfer location in preparation for installing them into vCD.

cp certificates.ks /opt/vmware/vcloud-director/data/transfer/certificates.ks

chown vcloud.vcloud /opt/vmware/vcloud-director/data/transfer/certificates.ks

Step 8. We going to use the cell management tool to import the certificates into vCD.

/opt/vmware/vcloud-director/bin/cell-management-tool certificates -j -p \
--keystore /opt/vmware/vcloud-director/data/transfer/certificates.ks \
--keystore-password ChangeMe

Step 9. Finally, restart the vCD service so that the new certificates are loaded and used.

service vmware-vcd restart

And that’s it. Give vCD a minute or two to get going and then open a new browser session to your instance. It should be nice and secure now. This will also allow you to connect through the console proxy without any issues.

secure.png

vCAV 3.0 Endpoint mappings.

Playing with vCAV and setting it up for both a lab and production environment has become considerably easier with vCAV 3.0 which is due for GA very soon. Due to the increased functionality in the solution and the ability to do a single node deployment for lab or dev environments, understanding the endpoint mappings is important. Below is a detailed look at all things networking for vCAV 3.0. (Copied from work done by  Andrey Petrov)

TLDR:

  1. Use port 443 on each appliance to do day 0 or day 2 config unless instructed otherwise.
  2. In dev environments and/or combined appliances, use:
    1. 8443 for the c4 admin UI
    2. 8442 for the tunnel admin UI
    3. 8441 for the manager admin UI
    4. 8440 for the replicator admin UI
  3. When adding local replicators, log into the manager htpps://mgr-ip:8441 and use local-rtr-ip:8043 (we almost managed to move this step in the c4 ui in 3.0, obviating the need to ever go to the manager during initial install & config, but that work was postponed and will be completed in a future release)
  4. When pairing with c4 use a hostname/literal-ip and port that lead to the tunnel data endpoint for the respective site. If you don’t have a port forwarder, or haproxy, etc (which is typically the case in dev envs), use the tunnel data endpoint directly: https://tunnel-ip:8048. Note: the public api endpoint configuration option in c4 should be explicitly set to haproxy:443 or tunnel:8048 (depending on your setup).

Services & Deployment roles

The vCAV stack consists of the following services:

  1. hbrsrv – low level replication data component, used by a replication at the destination site only.
  2. lwdproxy – adds encryption, authentication & authorization to hbrsrv, used by a replication at both the source and destination site.
  3. replicator – low level vCenter replication management component
  4. h4 manager – vCenter replication management component
  5. c4 – talks to vCloud Director & an h4 manager to manage and monitor vCD VM/vApp replications.
  6. tunnel – manages TLS tunnels across sites by running an embedded tlsnexus engine.

Deployment roles

Role
Services
onprem tunnel, replicator, lwdproxy, hbrsrv
management c4, manager
replicator replicator, lwdproxy, hbrsrv
tunnel tunnel
combined tunnel, c4, manager, replicator, lwdproxy, hbrsrv

Endpoints

Port
Name
Deployment Roles
Description
Usage
443 HTTPS onprem Iptables redirect to port 8440 (onprem replicator admin UI) On-prem admins for installation, configuration, day2 ops of on-prem replicator
443 HTTPS combined Iptables redirect to port 8443 (c4 public api endpoint & portal) Provider admins for installation, configuration, day2 ops of c4
443 HTTPS management Iptables redirect to port 8443 (c4 public api endpoint & portal) Provider admins for installation, configuration, day2 ops of c4
443 HTTPS replicator Iptables redirect to port 8440 (cloud replicator admin UI) Provider admins for installation, configuration, day2 ops of cloud replicator
443 HTTPS tunnel Iptables redirect to port 8442 (tunnel admin UI) Provider admins for installation, configuration, day2 ops of cloud tunnel
8043 replicator API onprem, replicator, combined Replicator API port Used by provider admin when adding local replicators. Also used internally by the h4 manager.
8044 manager API management, combined H4 Manager API port Used internally by c4 and the replicators. Should never be accessed by a human operator and/or public API client for any purpose.
8045 lwdproxy API onprem, replicator, combined lwdproxy API port Used internally by replicators to configure lwdproxy routes. Should never be accessed by a human operator and/or public API client for any purpose.
8046 c4 API management, combined C4 API port Used internally for cross-site communication between c4 instances and cross-site communication between on-prem rtr/virgo and cloud c4. Should never be accessed by a human operator and/or public API client for any purpose.
8047 Tunnel API onprem, tunnel, combined Tunnel service API port Internally by c4 (cloud side) and replicator (on-prem) for configuring the tunneling routes. Should never be accessed by a human operator and/or public API client for any purpose.
8048 Tunnel data tunnel, combined This is the single entry point for all ingress traffic including the UI, the public vCAV API, internal management traffic, replication data, etc. Typically, the provider will forward some-public-ip:443 to this endpoint, i.e. this endpoint is visible on the internet / remote sites. In production, the provider will use dnat/haproxy/nsx/etc to forward port public-ip:443 to the tunnel data endpoint. Then they explicitly set the c4 public api endpoint configuration option to public-ip:443

In devel/eval use cases, there might not be a haproxy/nsx/etc to forward the traffic, and then the tunnel-addr:8048 can be set directly as the c4 public api endpoint configuration option. For this to work other c4 sites and on-prem sites must have direct connectivity to tunnel-addr:8048 (this is usually the case in test/eval environments).

In any case when pairing with this cloud the on-prem admin needs to use the value that was configured in the c4 public api endpoint configuration option.

8123 hbrsrv API replicator, onprem, combined hbrsrv internal VMODL management API The replicator uses this to configure hbrsrv for accepting incoming replications. Access to this port from outside of the vcav appliance should be disallowed by the appliance firewall. Should never be accessed by a human operator and/or public API client for any purpose.
8440 Replicator admin UI replicator, combined, onprem Should only be used by provider admins for replicator day2 operations, when the combined deployment roles is in use.
8441 Manager admin UI combined, management Used by provider admins for manager install/config/day2 operations.

(In a future release we will eliminate the necessity to use this endpoint during initial setup.)

8442 Tunnel admin UI combined, onprem, tunnel Used by admins for tunnel day2 operations, when the combined deployment roles is in use.
8443 c4 public api combined,

management

Should never be used by human / api users.
31031 hbrsrv onprem, replicator, combined Should never be used by human / api users.
44045 lwdproxy onprem, replicator, combined Should never be used by human / api users.
44046 lwdproxy plain onprem, replicator, combined Should never be used by human / api users.

FAQ

  • Why do most services (tunnel, c4, manager, replicator) have two endpoints, e.g. c4 has 8443 and 8046?
    – Because client certificates are used internally in the system for authentication across sites and therefore we need a TLS point that allows client certificates. However, we also need to serve the admin UIs (in the c4 case the admin UI and the tenant UI are the same thing). We cannot just serve the UIs and the internal API on the same endpoint for the following reason. Browsers will detect if a server endpoint allows client certificates and will prompt the user to select a client certificate to use for the connection, if any client certificates are installed in the browser. This is at best annoying (the user needs to ‘cancel’ the client cert prompt in the browser) or will result in notAuthenticated errors (if the user attempts to use their e-banking certificate with the vCAV services), and at worst it renders the vCD ui plugin totally unusable (unlike when visiting a site, the browser handles ajax requests differently – it rejects outright all ajax requests to a server endpoints that allow client certs, without any warning or explanation!). Therefore, we use 80XX for internal communication between components, and 844X to serve our various UIs and other API clients.

SSL : Part 5.1 : CA Signed Certificates for vCloud Director with a single IP

Update: If you looking for a post on CA signed certificates for vCloud Director 10, go here.

This is a tweaked version of Part 5 and produces certificates for a vCD instance running on a single IP address as opposed to the usual 2, one for http access and one for the console proxy. Tomas Fojta explains the configuration for a single IP in this blog. It must be noted that even though vCD is using a single IP, there still needs to be two certificates in the keystore during configuration.

Step 1. First we are going to produce an unsigned certificate and place it in a new certificate store. (It will be replaced with a signed cert later but we need the keys for the signing) Open a SSH session to your vCD instance and change to the /tmp directory. Execute the two scripts below to create the certificate. It is placed in a certificate store called certificates.ks. You can ignore the warning about the JCEKS keystore using a propriety format. You should then have a file called certificates.ks in the /tmp directory.


/opt/vmware/vcloud-director/jre/bin/keytool -keystore certificates.ks \
-alias http \
-storepass ChangeMe \
-keypass ChangeMe \
-storetype JCEKS \
-genkeypair \
-keyalg RSA \
-keysize 2048 \
-validity 3650 \
-dname "CN=vcd-dc1-003.local, OU=Sales, O=VMware, L=Pittsford, S=New York, C=US" \
-ext "san=dns:vcd-dc1-003.local,dns:vcd-dc1-003,ip:192.168.20.83"

Step 2. Next we going to produce a certificate signing request (CSR) that we will send on to our Certificate Authority (CA). Once you execute the script below you should end up with a new file called vcd-dc1-003.csr.


/opt/vmware/vcloud-director/jre/bin/keytool -keystore certificates.ks \
-storetype JCEKS \
-storepass ChangeMe \
-certreq \
-alias http \
-file vcd-dc1-003.csr \
-ext "san=dns:vcd-dc1-003.local,dns:vcd-dc1-003,ip:192.168.20.83"

Step 3. From here we need to get the CSR signed by our lab CA. See Part 2 of this series to find out how. The output of that process will be a .cer file that contain the signed certificate. Make sure you also get a copy of the CA’s root certificate as you will need it in Step 4. See Part 1 of this series to get the CA Root certificate if you don’t already have it.

Step 4. We are now going to take the two .cer files collected in step 3 and load them into the certificate store file certificates.ks. You will need to use a tool like WinSCP to transfer the files to your vCD server. Once you have them there, execute the next two scripts to get the files into the store. Again, note that you must use the same alias names as in the script.


/opt/vmware/vcloud-director/jre/bin/keytool -keystore certificates.ks \
-storetype JCEKS \
-storepass ChangeMe \
-import \
-alias root \
-file LabCA.cer


/opt/vmware/vcloud-director/jre/bin/keytool -keystore certificates.ks \
-storetype JCEKS \
-storepass ChangeMe \
-import \
-alias http \
-file vcd-dc1-003.cer

Once this is done, list the contents of the certificate store to make sure that the root and http certificate are in there.
/opt/vmware/vcloud-director/jre/bin/keytool -storetype JCEKS -storepass ChangeMe -keystore certificates.ks -list001.png

Step 5. As I mentioned above, the configurator for vCD expects two certificates in the store even if you are using a single IP. Since we want to use the same certificate for both, we care going to copy the http certificate into the consoleproxy certificate. Run the 3 scripts below to create a new file called certs.ks that will contain the three required certificates.


/opt/vmware/vcloud-director/jre/bin/keytool \
-importkeystore \
-srckeystore certificates.ks \
-srcstoretype JCEKS \
-srcstorepass ChangeMe \
-srckeypass ChangeMe \
-srcalias http \
-destkeystore certs.ks \
-deststoretype JCEKS \
-deststorepass ChangeMe \
-destkeypass ChangeMe \
-destalias http


/opt/vmware/vcloud-director/jre/bin/keytool \
-importkeystore \
-srckeystore certificates.ks \
-srcstoretype JCEKS \
-srcstorepass ChangeMe \
-srckeypass ChangeMe \
-srcalias http \
-destkeystore certs.ks \
-deststoretype JCEKS \
-deststorepass ChangeMe \
-destkeypass ChangeMe \
-destalias consoleproxy


/opt/vmware/vcloud-director/jre/bin/keytool \
-importkeystore \
-srckeystore certificates.ks \
-srcstoretype JCEKS \
-srcstorepass ChangeMe \
-srcalias root \
-destkeystore certs.ks \
-deststoretype JCEKS \
-deststorepass ChangeMe \
-destalias root

And once again, list the contents of the certs.ks file to ensure you have three certificates and the thumbprint for the http and consoleproxy are the same.
/opt/vmware/vcloud-director/jre/bin/keytool -storetype JCEKS -storepass ChangeMe -keystore certs.ks -list002.png

Step 6. We are now ready to reconfigure (in my case) vCD. In order to get the new certificate store into vCD, we need to run the configure script in unattended mode. The script I use is as follows but you may need to change it depending on your lab setup. I have installed Postgres on my vCD server so you may have to adjust if you using Oracle or MSSQL. (If you are, you should consider switching to Postgres as support for Oracle is already depreciated in 9.1 and MSSQL will be depreciated in the next release! This is good news as VMware moves to making vCD available as an appliance.)

Stop vCD:

service vmware-vcd stop

Update the configuration:

/opt/vmware/vcloud-director/bin/configure \
-cons 192.168.20.83 \
--console-proxy-port-https 8443 \
-ip 192.168.20.83 \
--primary-port-http 80 \
--primary-port-https 443 \
-dbhost vcd-dc1-003.local -dbport 5432 -dbtype postgres -dbname vcloud -dbuser vcloud -dbpassword 'vcloudpass' \
-k /tmp/certs.ks \
-w 'ChangeMe' \
-loghost vrli-dc1.local \
-logport 514 \
-g \
--enable-ceip true \
-unattended

Start vCD:

service vmware-vcd start

And that’s it. Give vCD a minute or two to get going and then open a new browser session to your instance. It should be nice and secure now.

003.png004.png

SSL : Part 6 : CA Signed Certificates for vCloud Availability 1.5 C2C

Today we are going to work through replacing the self signed certs on the vCAV 1.5 C2C instances. If you are new to vCloud Availability for Cloud to Cloud, head on over to my college Daniel’s blog page here. He has a number of blogs around vCloud Availability.

vCAV C2C is the new generation of vCloud Directory Availability tools and will have DR2C added in the not too distant future. This build of vCAV radically improves the experience for both the provider when deploying and the customer when using the solution. By default, the appliances are deployed with a built in self signed certificate and if you want to expose the environment to the real world, you going to want to have properly signed certificates protecting the communications.

Step 1. First we are going to produce an unsigned certificates and place it in a new certificate store. (They will be replaced with signed certs later but we need the keys for the signing) Open a SSH session to your vCAV C2C instance and change to the /tmp directory. Execute the script below to create the certificate. It is placed in a certificate store called keystore.jks. You can ignore the warning about the JCEKS keystore using a propriety format. You should then have a file called keystore.jks in the /tmp directory.
NOTE: In the example below, I am using vmware as the password for both the private key and the key store itself. I suggest leaving them as vmware but if you are super security conscious, you will need to update the application.properties file in /opt/vmware/h4/cloud/config. Specifically these lines
keystore.location=./config/keystore.jks
keystore.password=vmware
keystore.alias=cloud
keystore.keypassword=vmware

keytool -keystore keystore.jks \
-alias cloud \
-storepass vmware \
-keypass vmware \
-storetype jks \
-genkeypair \
-keyalg RSA \
-keysize 2048 \
-validity 3650 \
-dname “CN=c2c-dc1-004.local, OU=Sales, O=VMware, L=Pittsford, S=New York, C=US” \
-ext “san=dns:c2c-dc1-004.local,dns:c2c-dc1-004,ip:192.168.21.84”

Step 2. Next we going to produce a certificate signing request (CSR) that we will send on to our Certificate Authority (CA). Once you execute the script below you should end up with a new file called c2c-dc1-004.csr.

keytool -keystore keystore.jks \
-storetype jks \
-storepass vmware \
-certreq \
-alias cloud \
-file c2c-dc1-004.csr \
-ext “san=dns:c2c-dc1-004.local,dns:c2c-dc1-004,ip:192.168.21.84”

Step 3. From here we need to get the CSR signed by our lab CA. See Part 2 of this series to find out how. The output of that process will be a .cer file that contain the signed certificate. Make sure you also get a copy of the CA’s root certificate as you will need it in Step 4. See Part 1 of this series to get the CA Root certificate if you don’t already have it.

Step 4. We are now going to take the two .cer files collected in step 3 (Root + Signed Cert) and load them into the certificate store file keystore.jks. You will need to use a tool like WinSCP to transfer the files to your C2C server. Once you have them there, execute the next two scripts to get the files into the store. Again, note that you must use the same alias names as in the script.

/opt/vmware/vcloud-director/jre/bin/keytool -keystore keystore.jks \
-storetype JCEKS \
-storepass ChangeMe \
-import \
-alias root \
-file LabCA.cer


/opt/vmware/vcloud-director/jre/bin/keytool -keystore keystore.jks \
-storetype JCEKS \
-storepass ChangeMe \
-import \
-alias http \
-file c2c-dc1-004.cer

Once this is done, list the contents of the certificate store to make sure you see the root cna cloud certificate. (As well as any intermediate certificates if there are any)
keytool -storetype JCEKS -storepass vmware -keystore keystore.jks -list
001.png

Step 5. Now we are ready to replace the self signed certs. They are in a file called keystore.jks in /opt/vmware/h4/cloud/config.
First lets rename the existing file so we can revert if things don’t work out.
mv /opt/vmware/h4/cloud/config/keystore.jks /opt/vmware/h4/cloud/config/keystore-old.jks
and then copy over the new keystore we just created
cp /tmp/keystore.jks /opt/vmware/h4/cloud/config/keystore.jks
Very important, don’t forget to set ownership of the keystore.
chown h4:root /opt/vmware/h4/cloud/config/keystore.jks

Step 5. Finally, reconfigure the appliance and restart the service
/opt/vmware/h4/bin/sysboot.py
systemctl restart cloud
Give it 2 minutes and check that it is up and running with
systemctl status cloud
002.png

Step 6. Open a browser and go to https://your-c2c-url:8046. Firstly, the browser should indicate that the certificate is valid and after logging in, you should see that the connection to the remote site is broken.
003.png
Click on Cloud Sites and then hit the REPAIR in the failed site. It will ask you to accept the new certificate. Click LOGIN and enter the credentials and it should all be working again.
005.png


All in one vCloud Director Appliance for your lab.

Update: With the delivery of vCD 10 came a much improved Appliance experience. I recommend using the appliance with vCD 10 for an lab (or production) deployments.

If you’re like me, you need to build or rebuild your vCD environment fairly often for various POCs. This blog will guide you to a quick and easy single VM vCD build that has PostgreSQL, RabbitMQ and vCD. I am going to use CentOS 7 for the platform as it has all the bits it needs and is fairly simple to wrap your head around if you don’t play too much with Linux.

First up, go and download yourself the CentOS installer ISO from here.

For my build I use 4 vCPUs, 8 GB of RAM and a 16GB HD. Note I have 2 network interfaces. One for HTTP and the other for Console Access.

001.png

I will not go through the CentOS install as there are plenty of resources out there on doing that. Once you have the install done, SSH into the VM using the root user. We will now install PostgreSQL.

I disable the firewalld process in my lab. This is not a recommended action in a production environment!
systemctl disable firewalld
systemctl stop firewalld

Install ntp so your time is synced. (For more details go here)
yum install ntp
systemctl start ntpd
systemctl enable ntpd
Edit the ntp config if you want to use an internal NTP server.
vi /etc/ntp.conf
My internal ntp server is 192.168.20.1 so I removed the centos servers and added
server 192.168.20.1 iburst
And restart ntp
systemctl restart ntpd

Next, make sure everything is up to date by doing 
yum -y update

Install Postgres (We need PostgreSQL 10) (If you doing this on RHEL, Daniel has a great post on installing Postgres10 here)
rpm -Uvh https://yum.postgresql.org/10/redhat/rhel-7-x86_64/pgdg-centos10-10-2.noarch.rpm
yum install postgresql10-server postgresql10
/usr/pgsql-10/bin/postgresql-10-setup initdb
systemctl start postgresql-10.service
systemctl enable postgresql-10.service
service postgresql-10 start
Set the postgres OS user password
passwd postgres
And the postgres PSQL user password
su – postgres
psql
ALTER USER postgres WITH PASSWORD ‘YourSuperSecretPassword’;
\q
Create the vcloud user and enter a password when prompted.
createuser vcloud –pwprompt
Now create the vcloud DB
psql
create database vcloud owner vcloud;
and set the vcloud password
alter user vcloud password ‘vcloudpass’;
and let the user log in
alter role vcloud with login;
\q

Lastly we need to enable logins to the DB using a user and password from the local machine and optionally from remote machines.
Change to the 10/data directory and edit the  pg_hba.conf file
vi pg_hba.conf
Add the following line at the end of the file.
host all all 0.0.0.0/0 md5
If you want to restrict connections to the local machine only, change the 0.0.0.0/32 to 127.0.0.1/32. For a lab, using 0.0.0.0/0 lets you connect to the DB from anywhere.
Save the file.
Edit the postgresql.conf file
vi postgresql.conf
Find the line containing listen_addresses and ensure there is no # in the front and change ‘localhost’ to ‘*’
Save the file and exit su.
exit
Finally restart postgres.
systemctl restart postgresql-10
You should now be able to connect to the vcloud DB using a tool like pgAdmin (which you can get here) If you have not disabled firewalld above, you will need to poke holes through the firewall to connect from a remote machine.\

Next up is the installation of RabbitMQ as the message bus. (Below are the command required to do this. If you want to see more details, go here)
yum -y install epel-release
yum -y update
yum -y install erlang socat
Install wget if you don’t have it installed
yum -y install wget
Now fetch and install the RabbitMQ rpm
wget https://www.rabbitmq.com/releases/rabbitmq-server/v3.6.10/rabbitmq-server-3.6.10-1.el7.noarch.rpm
rpm –import https://www.rabbitmq.com/rabbitmq-release-signing-key.asc
rpm -Uvh rabbitmq-server-3.6.10-1.el7.noarch.rpm
systemctl start rabbitmq-server
systemctl enable rabbitmq-server
And if all went well you should see it up and running with
systemctl status rabbitmq-server
If you have not disabled the firewall as above, see here for the firewall rules you need to add)
Enable management
rabbitmq-plugins enable rabbitmq_management
rabbitmqctl add_user admin StrongPassword
rabbitmqctl set_user_tags admin administrator
rabbitmqctl set_permissions -p / admin “.*” “.*” “.*”
Now you should be able to connect to the RabbitMQ UI at
http://your.ip.address:15672
vCD can use the admin user for the Q but I generally create a used called vcd in the RabbitMQ UI and give it permissions on /

Let’s install vCloud Director. You should download the rpm installer from the VMware download site. Copy it across to your VM using WinSCP.
First you will need to add a few dependencies
yum install libXdmcp
yum install libXtst
yum install redhat-lsb
Then execute the installer.
chmod u+x vmware-vcloud-director-distribution-9.5.0-11038216.bin
./vmware-vcloud-director-distribution-9.5.0-11038216.bin
When the installer asks if you want to run the configuration script, select n (no). We will execute it later once we have created the certificates.

At this point, if you want to make a template out of the VM, go ahead. That way, you have a nice starting point from which to build new vCD instances. This is done before the config so you can have multiple instances running off the same template.

We now need to produce CA signed certificates. I have a number of other blogs on this that can be found here. Stop after Step 4. We will use the certificates.ks file in the configuration step.

The last step is to run the setup script. Execute
/opt/vmware/vcloud-director/bin/configure
You will first be asked to assign the HTTP and Concole Proxy IPs.
Next is the certificate file you created earlier /tmp/certificates.ks as well as it’s password.
Then a syslog server if you have one.
And lastly the DB information. Select PostgreSQL and enter the FDQN of the VM (or it’s IP if you have it fixed), the port, DBname, User name and finally password.
At this point, the installer creates all the DB tables etc and then asks you to join the Customer Experience program and at last, asks if you want to start vCD.

Wait a few mins after the script completes and you should he able to open your browser to https://your.vcd.instance

Happy vCDing!


SSL : Part 5 : CA Signed Certificates for vCloud Director

Update: If you looking for a post on CA signed certificates for vCloud Director 10, go here.

Is this part of the series we will be creating CA signed certificates for vCloud Director. vCD requires two certificates, one for the HTTP service and one for the console proxy service. vCD has some specific requirements and one of them is to use Java version 7 runtime environment to produce the keys, certificates and certificate signing requests. We will still be using the Microsoft Certificate authority to sign the CSRs. See Part 1 for details on setting that up. vCD has the required tools already installed so we will be doing the main grunt work by SSHing to vCD.

There are a few things to note before we begin. This process works either during a deployment of vCD or after you have already deployed vCD. In the latter case, you will need to call the configure script for vCD in unattended mode in order to redefine the certificate store. I will go through how to do that too. You must also be sure to name the aliases in the certificate store exactly as I have them. There is no way to define the aliases in the configure script and the values I have used are the ones the script looks for when reading the certificate store. Lastly, I am using two IPs for my vCD. You can do it with one but 2 simplifies things and allows you to use port 443 for both services.

So without further ado, lets build some certificates.

Step 1. First we are going to produce two unsigned certificates and place the, in a new certificate store. (They will be replaced with signed certs later but we need the keys for the signing) Open a SSH session to your vCD instance and change to the /tmp directory. Execute the two scripts below to create the two certificates. They are placed in a certificate store called certificates.ks. You can ignore the warning about the JCEKS keystore using a propriety format. You should then have a file called certificates.ks in the /tmp directory.

/opt/vmware/vcloud-director/jre/bin/keytool -keystore certificates.ks \
-alias http \
-storepass ChangeMe \
-keypass ChangeMe \
-storetype JCEKS \
-genkeypair \
-keyalg RSA \
-keysize 2048 \
-validity 3650 \
-dname “CN=vcd-dc1-001.local, OU=Sales, O=VMware, L=Pittsford, S=New York, C=US” \
-ext “san=dns:vcd-dc1-001.local,dns:vcd-dc1-001,ip:192.168.20.81”

/opt/vmware/vcloud-director/jre/bin/keytool -keystore certificates.ks \
-alias consoleproxy \
-storepass ChangeMe \
-keypass ChangeMe \
-storetype JCEKS \
-genkeypair \
-keyalg RSA \
-keysize 2048 \
-validity 3650 \
-dname “CN=vcdconsole-dc1-001.local, OU=Sales, O=VMware, L=Pittsford, S=New York, C=US” \
-ext “san=dns:vcdconsole-dc1-001.local,dns:vcdconsole-dc1-001,ip:192.168.22.81”

Step 2. Next we going to produce a certificate signing request (CSR) that we will send on to our Certificate Authority (CA). Once you execute the two scripts below you should end up with two new files called vcd-dc1-001.csr and vcdconsole-dc1-001.csr.

/opt/vmware/vcloud-director/jre/bin/keytool -keystore certificates.ks \
-storetype JCEKS \
-storepass ChangeMe \
-certreq \
-alias http \
-file vcd-dc1-001.csr \
-ext “san=dns:vcd-dc1-001.local,dns:vcd-dc1-001,ip:192.168.20.81”

/opt/vmware/vcloud-director/jre/bin/keytool -keystore certificates.ks \
-storetype JCEKS \
-storepass ChangeMe \
-certreq \
-alias consoleproxy \
-file vcdconsole-dc1-001.csr \
-ext “san=dns:vcdconsole-dc1-001.local,dns:vcdconsole-dc1-001,ip:192.168.22.81”

Step 3. From here we need to get the CSRs signed by our lab CA. See Part 2 of this series to find out how. The output of that process will be two .cer files that contain the signed certificates. Make sure you also get a copy of the CA’s root certificate as you will need it in Step 4. See Part 1 of this series to get the CA Root certificate if you don’t already have it.

Step 4. We are now going to take the three .cer files collected in step 3 and load them into the certificate store file certificates.ks. You will need to use a tool like WinSCP to transfer the files to your vCD server. Once you have them there, execute the next three scripts to get the files into the store. Again, note that you must use the same alias names as in the script.

/opt/vmware/vcloud-director/jre/bin/keytool -keystore certificates.ks \
-storetype JCEKS \
-storepass ChangeMe \
-import \
-alias root \
-file LabCA.cer

/opt/vmware/vcloud-director/jre/bin/keytool -keystore certificates.ks \
-storetype JCEKS \
-storepass ChangeMe \
-import \
-alias http \
-file vcd-dc1-001.cer

/opt/vmware/vcloud-director/jre/bin/keytool -keystore certificates.ks \
-storetype JCEKS \
-storepass ChangeMe \
-import \
-alias consoleproxy \
-file vcdconsole-dc1-001.cer

Once this is done, list the contents of the certificate store to make sure all the bits are in there.

/opt/vmware/vcloud-director/jre/bin/keytool -storetype JCEKS -storepass ChangeMe -keystore certificates.ks -list01.png

I suggest moving this file to a more permanent location. I put mine in /opt/keystore.

Step 5. We are now ready to reconfigure (in my case) vCD. In order to get the new certificate store into vCD, we need to run the configure script in unattended mode. The script I use is as follows but you may need to change it depending on your lab setup. I have installed Postgres on my vCD server so you may have to adjust if you using Oracle or MSSQL. (If you are, you should consider switching to Postgres and support for Oracle is already depreciated in 9.1 and MSSQL will be depreciated in the next release! This is good news as VMware moves to making vCD available as an appliance.)

Stop vCD:

service vmware-vcd stop

Update the configuration:

/opt/vmware/vcloud-director/bin/configure \
-ip 192.168.20.81 –primary-port-https 443 \
-cons 192.168.22.81 –console-proxy-port-https 443 \
-dbtype postgres -dbhost vcd-dc1-001.local -dbname vcloud -dbuser vcloud -dbpassword vcloudpass \
-k /opt/keystore/certificates.ks -w ChangeMe \
-loghost vrli-dc1.local \
–enable-ceip true \
-unattended

Start vCD:

service vmware-vcd start

And that’s it. Give vCD a minute or two to get going and then open a new browser session to your instance. It should be nice and secure now.

02.png

SSL : Part 4 : CA Signed Certificate for vRealize Operations Manager

vRealize Operations Manager has a similar process to installing certificates that we went through with vRealize Log Insight with one minor tweak. When creating the PEM file to be loaded into the appliance, you need to make sure you have the order of the certificates correct in the file. If they are not correct, the PEM file will not be validated and you will be unable to proceed. The file also needs to have a .PEM extension.

Again you will need to have openssl installed to produce the keys and CSRs for this process. If you don’t have it, go here to get it. In the examples below, when I execute openssl commands from the command prompt, I am not showing paths. Depending on your installation of openssl and where you are executing from, you may need to add paths before the openssl command and file names in the command.

Step 1. First we going to generate a 2048 bit key. The key is placed into a file called vrops-dc1.key. This file will be used to generate the CSR as well as being loaded onto the Log Insight instances later in the process.

openssl genrsa -out vrops-dc1.key 2048
Generating RSA private key, 2048 bit long modulus
……………………………………………………………………………+++
…..+++
e is 65537 (0x10001)

Step 2. Next we are going to prepare a csr (Certificate Signing Request) This file is submitted to the Certificate Authority and used to create a signed certificate.
The vrops-dc1.cfg file looks like this:

[ req ]
default_bits = 2048
default_keyfile = vrops-dc1.key
distinguished_name = req_distinguished_name
encrypt_key = no
prompt = no
string_mask = nombstr
req_extensions = v3_req

[ v3_req ]
basicConstraints = CA:FALSE
keyUsage = digitalSignature, keyEncipherment, dataEncipherment
extendedKeyUsage = serverAuth, clientAuth
subjectAltName = DNS:vrops-dc1, DNS:vrops-dc1.local, DNS:vrops-dc1-001, DNS:vrops-dc1-001.local, DNS:vrops-dc1-002, DNS:vrops-dc1-002.local, IP:192.168.20.30, IP:192.168.20.31, IP:192.168.20.32

[ req_distinguished_name ]
countryName = US
stateOrProvinceName = NY
localityName = Pittsford
organizationName = VMWare
organizationalUnitName = VCPP Sales
commonName = vrops-dc1.local

In my lab I have 2 Operations Manager servers behind a OPNsense load balancer. In order to be able to connect to the instance using the VIP as well as directly to each of the instances without a certificate error, I have added the VIP and the IPs of each instance as well as the short and long names.

Execute the following. The CSR file will be called vrops-dc1.csr and is what must be shipped to your Certificate Authority.

openssl req -new -key vrops-dc1.key -out vrops-dc1.csr -config vrops-dc1.cfg

Step 3. From here we need to get the CSR signed by our lab CA. See Part 2 of this series to find out how. The output of that process will be a .cer file that has the signed certificate. Make sure you also get a copy of the CA’s root certificate as you will need it in Step 4. See Part 1 of this series to get the CA Root certificate if you don’t already have it.

Step 4. We now need to combine the Key generated in Step 1 and the CA Root Certificate and the .cer file produced in step 3. As I mentioned in the intro, it is important to put the pieces into a .PEM file in the correct order. Make sure to save it with a .PEM extension. Use a text editor to create a new file and place the contents of the signed certificate (from Step 3) into it. Next open key file (from Step 1) and put it after the certificate. Lastly, put the CA certificate (and any intermediate CA certificates) into the file and save it. It should look something like this:

—–BEGIN CERTIFICATE—–
MIIFlTCCA32gAwIBAgITdgAAABZtfJXdkMVXVAAAAAAAFjANBgkqhkiG9w0BAQsF
ADAQMQ4wDAYDVQQDEwVMYWJDQTAeFw0xODA1MDMxMjE3MTdaFw0xOTA1MDMxMjI3
MTdaMG4xCzAJBgNVBAYTAlVTMQswCQYDVQQIEwJOWTESMBAGA1UEBxMJUGl0dHNm
b3JkMQ8wDQYDVQQKEwZWTVdhcmUxEzARBgNVBAsTClZDUFAgU2FsZXMxGDAWBgNV
….
….
k1qa8JtHuZoL1ABjoMt2Wt4617SPwSKx/7ISp18Okvs49GL5OpDWJd2qhTsxtCmG
MRRlUbaxq3ldP55lGhAWVMLHbw/DOS3Ja6dCQbSjF8z97AT0vaipgl3vElkwqThd
2+TvTMZzRWVoA5UGftPaqRILh4C65OqGYND4hpK28MA26GgB3rETef7Vf9oksRZv
BgCB7S+ZwuVlYyJIfadUHInpStcOSLpsz7/sNNEdGKPUr4BidQUkKSk=
—–END CERTIFICATE—–
—–BEGIN RSA PRIVATE KEY—–
MIIEogIBAAKCAQEAnSUgrV6MpS39uvtz2/VNpY+BmdI9CZaShD+94tbvI1V4QreP
XaC1jZy6AReB2libopO4kFVTGfP3kLpIfoarvZlqtkwmNraJ/tm5pt4R3L/ESLk7
A6Hs0Qv4uHe0oTDY+cu6VTeuP6GaowlPpTKYx1gmg49srxk4U6W9xYRvaIPw4iW3
dE9OHqB05MD5mYwFOPPH8YhpihxWX4bG6+fdj2ZzJme1dlY9o1qmEbolCluAGjnh
….
….
z0k17KSa/ruNv2nnnY15ntKu2hPWBn9Jf9m8zYK1gfW+e0H8NaCHqOBAE+8YrrcD
UUoFAoGAJ17yakk7R6LcCEVX6hjnBUHyNR6mueDh/ItLIQoP3/sQ5mkCF/LMdyZO
x38Ys+FPzdf065dUCdKfGBfDxH6ZeQChyQSPQK2IGXwDP5QTOe/khCzHMh4Z/38G
JHUO9AAWsiAu8iY3bD+ZBwNrNE2CbnkbcSie4EbsISX6AJ6c3FY=
—–END RSA PRIVATE KEY—–
—–BEGIN CERTIFICATE—–
MIIE+zCCAuOgAwIBAgIQawsxF90J0r5JtCHLqV7awjANBgkqhkiG9w0BAQsFADAQ
MQ4wDAYDVQQDEwVMYWJDQTAeFw0xNzEwMjYyMDM1NTBaFw0yNzEwMjYyMDQ1NDZa
MBAxDjAMBgNVBAMTBUxhYkNBMIICIjANBgkqhkiG9w0BAQEFAAOCAg8AMIICCgKC
AgEAv/PKRLqtgtWSS5fofsV4Bvniwzkiky8lPP7XCCG9ifdRy0eYpkM1y3Lnf0s6
….
….
eTrYP+eDerb910j0cvl9EpwkfizxKHznE/MBDXCseF1EqbIfAlokJyEyGRQp7Izf
vzMcx3oE5+BULe3kXMGUZppKDR2tmTG8E8v2I8liSKqjvkq3W5OBLHKRt+6O7Dx1
25YeFp7xN7dn6jjA9klYCCxYwKvLZg2dxWrfiw1+BuDJhzistLx1uVIAp1An0KGs
HGFxhql0/9jVqXyOmOMneU7lG5Spawik2NXCE3C0ow==
—–END CERTIFICATE—–

Step 5. Finally we are going to load the certificate into the vROps server. The great thing about vROps is there is a method to do this directly in the UI and all instances in the cluster automatically get the certificate so there is only one place that this needs to be done.

Connect to the admin UI by going to https://<YOUR_VROPS_URL_OR_IP>/admin. Click the certificate icon in the top right of the UI.

01.png

This opens a dialog to replace the existing certificate. Click Install New Certificate

02.png

Click Browse and select the .PEM file you created.

04.png

Ensure the Certificate Information contains the details of the certificate you created earlier in Step 3. Click Install. Wait for the install to complete.

Step 6. Open a new browser session and point to the vROps instance. The browser should now show the site as secure.

05.png

In Part 5 in the series we will add certificates to vCloud Director.